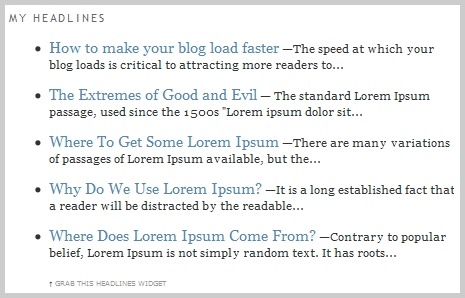
Adding some headlines to your web page provides your readers the quick-scan way to know instantly what your recent blog entries are about. It’s also a good way to attract attention and to encourage the reading of recent posts.
Screenshot
Code
To copy, click inside the box then press Ctrl+C
Installation
1. Go to your Blogger Dashboard > your blog’s Layout > Page Element > Add a Gadget > HTML/JavaScript 2. Copy and paste the code into the new HTML/JavaScript. 3. In the code, look for the line…
you can change the number of characters of the post summary (excerpt), or
you can display recent posts as list (post titles only)
show the post dates
See Installation and Other Options below.
Get Code
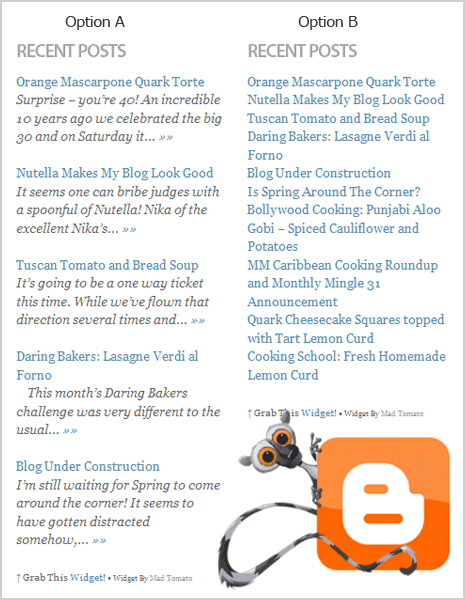
Option A
(With post excerpts)
Option A
RECENT POSTS WIDGET 2.0
To copy, click inside the box then press Ctrl+C
Option B
(Displayed as list)
Option B
RECENT POSTS WIDGET 2.0
To copy, click inside the box then press Ctrl+C
Installation
1. Go to your Blogger Dashboard > your blog’s Layout > Page Element > Add a Gadget > HTML/JavaScript 2. Copy and paste the code into the new HTML/JavaScript. 3. In the code, look for the line…
How to change the Number of Posts To change the number of posts, just look for the number 5 (for Option A) in the code and replace it with the number of posts you want to be displayed. (For Option B, look for the number 10).
Recommend setting for Option A: 5 to 8. Recommend setting for Option B: 5 to 15.
… var numposts = 5;var…
How to change the Number of Characters (Excerpt) This widget is set to display an excerpt of 100 characters of each post. If you want to change that number, just look for the number 100 in the code and replace it with the number of characters you want to be displayed.
Recommended setting: 50 to 100.
… numchars = 100;var…
How to Show Post Date If you want to show the post date, look for the line with the word showpostdate in the code. Then change its value from false to true (shown in color blue below).
… showpostdate = false;var…
That’s it! Please let me know what you think of this widget by leaving a comment below.
Add a Google Translate Mini Flags widget to your blog. Powered by Google Translate, this widget lets your visitors view your pages translated in their own native languages with just a click.
Single Column
Code:
White Background
Code:
Transparent Background
Single Row
Code:
Double Row
Code:
This widget is tested on Blogger, Wordpress and Joomla. It might also work on other platforms.
How to add the Google Translate Mini-Flags Widget to your blog:
Blogger
1. Go to your Dashboard > Layout > Add a Page Element > HTML/JavaScript 2. Paste the code 3. Add a title. Ex: Translate, Translate this page, Google Translate (Optional) 4. Save (or Save Changes).
Wordpress
1. Login to your Admin panel > Presentation tab > Widgets tab 2. Paste the code into the Text Widget. If there’s no Text Widget available, add one. 3. Add a title. Ex: Translate, Translate this page, Google Translate (Optional) 4. Save.
Joomla site
1. Login to your Admin panel > Modules - Site Modules > click New 2. Paste the code into the Custom Output content box 3. Adjust module details and menu item links if necessary 4. Click Apply or Save.
Google Translate is still on its beta phase. Much like with other web page translation services, your readers might find parts of the translation very funny. Google has yet to meet their standards on this.
This widget is distributed freely. Feel free to use it, change it to meet your needs. Just drop me a comment below to let me know it helped out, or if you have questions or problems adding it your blog or site.
If you've added a search widget to your blog, you may be wondering how it could look a bit more stylish! After all, the default gray button isn't the most desirable button in the world.
Styling a search widget isn't difficult at all. You can customize the button using CSS or replace this with an image instead. Another customization option is to add some informative text inside the search box and remove the search button altogether.
In this post, we're going to look at some options and methods of customizing the search widget, so you can choose the method which works best for you and style your search box to match the overall design of your own customized blog.
Search widgets are a type of form, constructed of a text box (the area where you type the search terms), a submit button, and some hidden elements which send information to the server about the search which is being performed.
If you're using a simple Blogger search widget, the code for your search widget will look something like this:
The elements which we can style are highlighted in red. The "search-box" element is the box which contains the search text, while the "search-btn" is the button keyed to submit the search query to the server.
By default, this simple search widget will appear like this in your template:
But using some simple techniques, we can make this look a whole lot prettier!
Using CSS to style the search widget
The easiest customizations can be achieved using only "inline CSS": this means that the search box and button can be styled within the code used for the search box.
For example, let's say we wanted the search box to have a pale blue background and a dark blue border. To achieve this, we simply add some style declarations to the "search-box" element, like this:
By adding these style declarations, we can create a search form which looks like this:
We can add style to the search button in the same way. This time, the background will be dark blue with a red border, while the text is white and bold:
Note that in this example, I used "outset" rather than "solid" for the border property; this ensures the button looks raised rather than flat, and helps readers understand that it is a button which can be clicked.
Here is the resulting form:
You can experiment with different colors ans styles for your own search form to create a unique design.
Changing the visible text within the form
You could add some text within the search box as a guide for your readers (eg: Search this blog!).
This is achieved by adding a "value" to the search box, like this:
This will appear like this:
To change the text on the search button, we only need to change the value to our preferred term:
value="Search" type="submit"/>
If you prefer the button to say "Go!", you could simply replace the value of "Search" with "Go!" instead:
value="Go!" type="submit"/>
Using an image instead of a button
Using an image instead of a button isn't as complicated as you may think! For this, we simply need to change the input type from "Submit" to Image" and specify a URL for the image.
First of all, you will need to find the image you would like to use, and upload this to an external hosting account.
It is advisable to use a small image or icon for this (16x16px or slightly larger would be a perfect size for a search form). There are many free search icons available from Iconlet, or you could download an icon pack and choose a suitable image instead.
For this example, I'm going to use this icon from Iconlet:
To use this icon instead of the button for my search form, this is the code I will use:
Notice that I have changed the type of the input in this form from "submit" to "image", and have added the URL of my image afterwards. The style declarations align the image against the search box, adding some space to the left, and ensuring this doesn't float above the search box.
This is what the image will look like in the search form:
When using your own image instead of the submit button, be sure to reference the correct URL of your image.
You may also need to adjust the margins slightly for images of a different size to the one used in this example.